Lesson · 3rd & 4th Grade
Volume
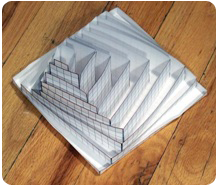
Students particularly enjoy this project. They learn to calculate the volume of nine nested boxes, which can also be converted into a 45-centimeter-tall tower. By the end, students can explain why a tall skinny box and a wide flat box can hold exactly the same number of cubes.
The big idea
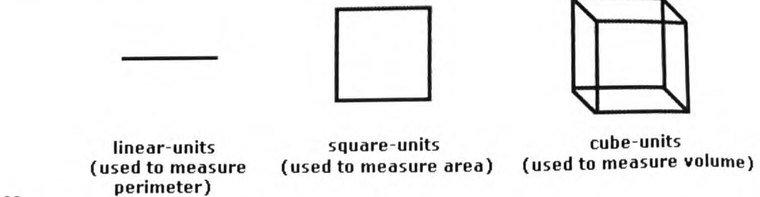
Before students begin working, explain how volume relates to what they already know about perimeter and area. Perimeter is measured in linear units. Area is measured in square units. Volume is measured in cube units. Draw examples of all three on the board. Volume is "3D" because it measures three dimensions, or three directions.
Show students a completed set of nine nested boxes and explain that each box has a length, a width, and a height. If we multiply the three dimensions of a box, we discover how many cubes can fit inside it, and the number of cubes that can fit inside a box is called its volume.
Learning objectives
By the end of the lesson, students will be able to:
- Calculate the volume of a box by multiplying length × width × height.
- Explain that volume is the number of cubic units that fit inside a shape.
- Distinguish linear units (perimeter), square units (area), and cube units (volume).
- Recognize that two differently shaped boxes can have the same volume, so "biggest" depends on what you measure.
Common Core alignment
- CCSS.MATH.CONTENT.5.MD.C.3
Recognize volume as an attribute of solid figures and understand concepts of volume measurement.
Recognizing volume as the number of cube units inside a solid, distinct from area and perimeter, is the volume concept this standard introduces.
- CCSS.MATH.CONTENT.5.MD.C.5
Relate volume to the operations of multiplication and addition and solve real world and mathematical problems involving volume.
Computing each box's volume as length × width × height is exactly the formula this standard names.
Materials
- Box sheets, pages 136–144 (1 set per student)
- Scissors (1 per student)
- One or more scotch tape dispensers
- The completed nine-box set, assembled by the teacher before the lesson
Which box is biggest?
Demonstrate how the nine nested boxes can be converted into a tower, then ask, "Which box is the biggest?" If students answer the wide one on the bottom, say "What do you mean? That box is so flat!" If they answer the tall one on top, say "Really? That box is so skinny!" The point is to remind them that every box has three dimensions. Some boxes are larger in length and width, others larger in height. The only way to really find out which box is "biggest" is to figure out how many cubes each one can hold.
Before showing students how to build the boxes, model how to use counting to measure a box's length, width, and height. For example, the tallest box is 2 centimeters long, 2 centimeters wide, and 9 centimeters high. Multiplying 2 × 2 × 9 = 36 gives the number of cubic centimeters that fit inside, its volume. (You can also point out that 2 × 2 = 4 is the area of the box's base, so the volume is simply the area of the base, 4, times the height, 9, which again gives 36.) It's worth re-teaching how to calculate volume after students have finished building their own projects.
The project
Fully model the construction of one box, preferably one of the middle sizes. Each box is made by cutting along the thick dark lines on the box sheets, folding the walls upward, and applying a piece of tape to each of the four edges. The nine sheets make nine boxes.
The walls of each box are folded up so their grids face outward. To tape an edge, students first stick the tape to one wall, then fold the two walls so they are just barely touching, not overlapping, and press the tape onto the second wall.
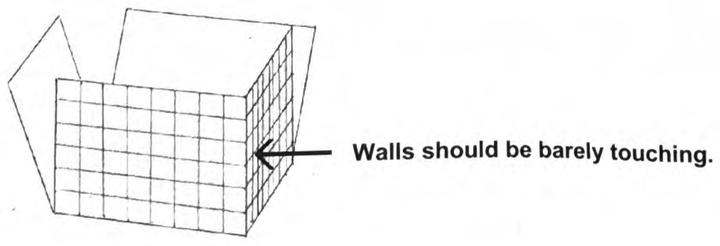
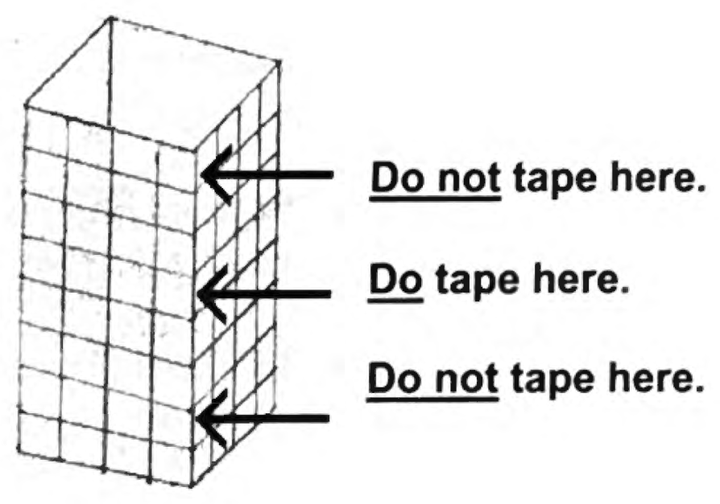
Tape each wall near its middle, not near the top or bottom. Tape placed in the middle of a wall holds the box square; tape near an edge lets it skew.
The biggest practical challenge is distributing all that tape: four pieces per box, thirty-six per student. A single teacher can manage it, but help is better. If no other adult is available, hand extra tape dispensers to a few student volunteers and distribute tape by sticking clusters of half-inch pieces along the edges of students' desks; let volunteers help only in brief intervals so they have time for their own projects. To transition into the assessment, the teacher and the whole class calculate the volume of a few boxes together.
Common student mistakes
- Judging "biggest" by one dimension. The tallest or widest box isn't necessarily the biggest. Volume is what settles it.
- Taping the walls too high or too low. Tape placed near a wall's middle holds the box square; tape near an edge lets it skew.
Related lessons
Prisms and Pyramids
Extends 3D understanding from boxes to other prisms and to pyramids, and introduces edge / face / vertex vocabulary.
Area
The 2D analogue: counting square units across a surface. A box's volume is just the area of its base times its height.
Perimeter
The 1D analogue: counting linear units around a shape. Together with area and volume it completes the linear / square / cubic ladder.
Multiplication
Volume's length × width × height is multiplication; this lesson lands more easily once facts are automatic.