Lesson · 3rd & 4th Grade
Prisms and Pyramids
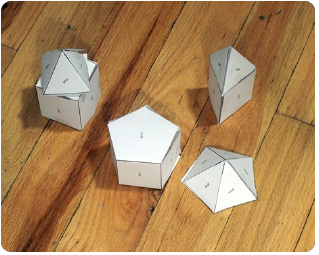
This lesson teaches students how to tell the difference between two types of three-dimensional shapes, prisms and pyramids, and how to identify and count each shape's edges, vertices, and faces. Students build a total of three prisms and three pyramids.
The big idea
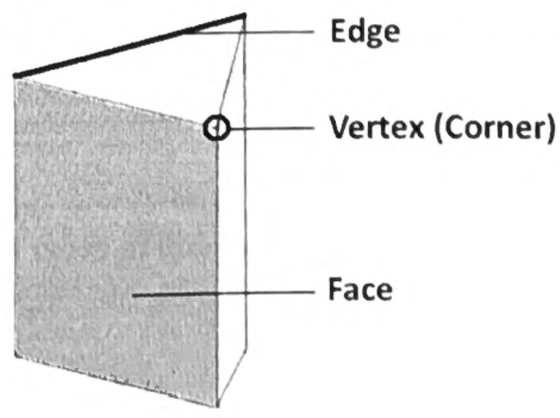
Begin by showing students a number of pre-constructed prisms and pyramids, and call on some of them to describe the difference between the two types of shape. Most students will quickly notice that prisms have a flat top while pyramids have a pointed top. Make sure they also realize that the sides of prisms are rectangles (or parallelograms), while the sides of pyramids are triangles. Then explain the difference between an edge, a face, and a vertex, using a diagram drawn at the front of the room.
Learning objectives
By the end of the lesson, students will be able to:
- Tell a prism from a pyramid by its top and its sides.
- Define an edge, a face, and a vertex.
- Count the edges, faces, and vertices of a 3D shape.
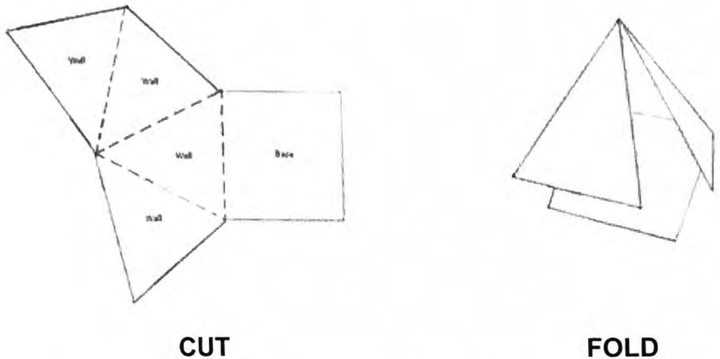
- Build prisms and pyramids by cutting, folding, and taping.
Common Core alignment
- CCSS.MATH.CONTENT.2.G.A.1
Recognize and draw shapes having specified attributes, such as a given number of angles or a given number of equal faces. Identify triangles, quadrilaterals, pentagons, hexagons, and cubes.
Identifying prisms and pyramids by their attributes (flat or pointed top, rectangular or triangular sides) is the kind of shape-by-attribute work this standard begins.
- CCSS.MATH.CONTENT.6.G.A.4
Represent three-dimensional figures using nets made up of rectangles and triangles, and use the nets to find the surface area of these figures.
Cutting, folding, and taping the nets to build three prisms and three pyramids is the net-to-solid construction this standard names.
Materials
- Pyramid sheets, pages 131–132 (1 set per student)
- Prism sheets, pages 133–135 (1 set per student)
- Scissors (1 per student)
- A scotch tape dispenser (for the teacher)
- The completed project, prepared by the teacher before the lesson
The project
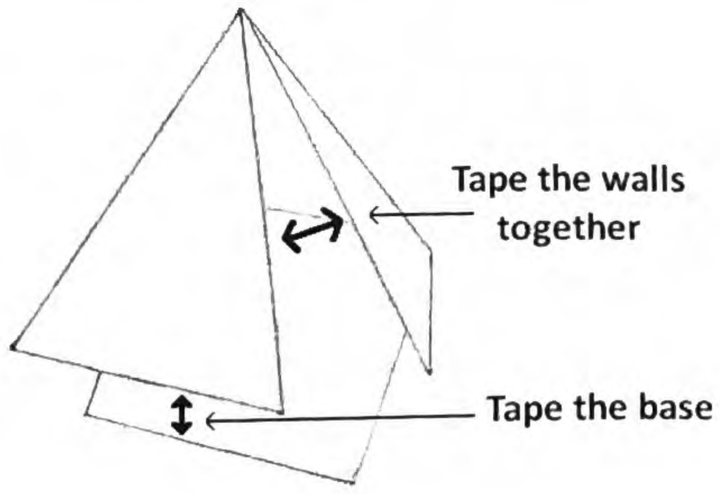
Students make their three pyramids first, cutting along the solid lines and folding along the dotted lines. Each pyramid needs two half-inch pieces of tape, one to hold the walls together and one to hold the base in place. When taping two edges together, students first stick the tape to one edge, then, making sure the walls are just barely touching and not overlapping, fold the tape over so it sticks to the other wall. Distributing all that tape goes faster with the help of a student or another adult.
Next, students make three prisms the same way, cutting along the solid lines and folding along the dotted lines. Each prism needs three half-inch pieces of tape, one for the walls and one for each base. Once all of the pyramids and prisms are finished, have students practice counting each shape's faces, edges, and vertices.
Common student mistakes
- Stopping at "flat top versus pointed top." That is the easy part. Students also need to see that prism sides are rectangles while pyramid sides are triangles.
- Overlapping the walls when taping. The walls should just barely touch, not overlap, or the shape comes out skewed.
- Miscounting edges, faces, and vertices. It is easy to double-count an edge or skip a hidden face. Counting on the finished solid, turning it as they go, keeps the totals honest.
Related lessons
Volume
Volume measures the space inside boxes, the prism students start with here.
Shapes
The flat shapes sorted there are the faces of these 3D solids.
Area
Each face is a flat region with an area, linking 3D shapes back to 2D measurement.
Similar Triangles
A pyramid's sides are triangles, the shape studied in that lesson.