Lesson · 2nd, 3rd, & 4th Grade
Symmetry
This lesson teaches students how to make symmetrical designs and how to distinguish between vertical symmetry, horizontal symmetry, and rotational symmetry.
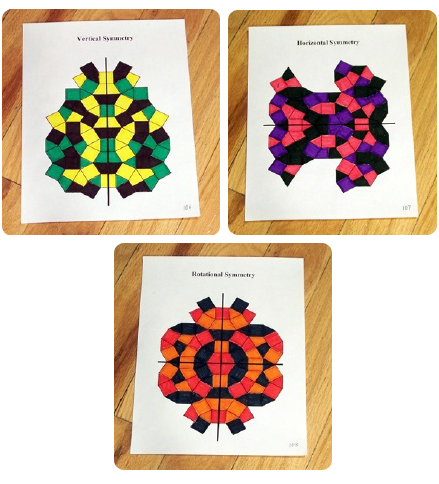
 They color three designs in turn, moving from the easiest type of symmetry to the hardest.
The big idea
Start by offering students a simple definition of symmetry: "an image that is the same on both sides." This definition is not entirely accurate, since from it one could decide that an image with matching sides but no real line of symmetry counts. A more precise understanding forms in students' minds once they begin the project.
Hang completed examples of all three symmetry projects at the front of the room, along with the matching uncolored sheets, and use them to summarize the three types:
- Vertical symmetry has a vertical line of symmetry, so the left and right halves are reflections of one another (but not necessarily the top and bottom).
- Horizontal symmetry has a horizontal line of symmetry, so the top and bottom halves are reflections of one another (but not necessarily the left and right).
- Rotational symmetry has both a vertical and a horizontal line of symmetry, so both the left/right halves and the top/bottom halves are reflections of one another.
Learning objectives
By the end of the lesson, students will be able to:
- Make a symmetrical design by keeping opposite shapes the same color.
- Identify a line of symmetry in an image.
- Distinguish vertical, horizontal, and rotational symmetry.
- Explain that each shape sits the same distance from the line of symmetry as its opposite.
Common Core alignment
- CCSS.MATH.CONTENT.4.G.A.3
Recognize a line of symmetry for a two-dimensional figure as a line across the figure such that the figure can be folded along the line into matching parts. Identify line-symmetric figures and draw lines of symmetry.
The vertical and horizontal designs are exactly the line-symmetric figures this standard names; the rotational design extends the same idea to two perpendicular lines of symmetry.
Materials
- Symmetry sheets, pages 104–106 (one of each type per student)
- Markers (1 box per student)
- The completed project, prepared by the teacher before the lesson
The project
Tell students they will use three marker colors to make their first symmetrical design. They should start with vertical symmetry, since it is usually the easiest to grasp visually. While working, the most important rule is that any shape they color on one side they must also find and color on the other side. In other words, opposite shapes need to be the same color. Model the coloring of a few opposites. Another way to show the idea is to explain that each shape is the same distance from the line of symmetry as its opposite, which you can demonstrate by drawing arrows on the example. A student is finished only once every shape in the design is colored.
Horizontal symmetry comes next. A design with this type of symmetry is usually a little harder for students, probably because, unlike vertical symmetry, it does not line up with the natural symmetry of a person's face and eyes. After a few mistakes, students get the hang of it. Finally, on the last sheet, students create designs with two lines of symmetry, which is rotational symmetry. You can describe it as "finding each shape's three other opposites," since each shape is part of a group of four. It helps to keep all three types of symmetry sheets in an accessible spot, so students who finish other work early can make new designs.
Common student mistakes
- Coloring a shape on only one side. Every colored shape needs its matching opposite filled in with the same color.
- Treating horizontal symmetry like vertical. The line of symmetry runs the other way; the top and bottom mirror each other now.
- Forgetting a partner in rotational symmetry. Each shape belongs to a group of four, not a pair.
Related lessons
Shapes
Symmetry is one of the attributes used to describe and sort the shapes in that lesson.
Reflections, Translations, & Rotations
Reflection and rotation are exactly the moves behind vertical and rotational symmetry.
Perpendicular & Parallel Lines
A line of symmetry behaves like the perpendicular lines studied there.
Similar Triangles
Another lesson built on matching parts of a figure to one another.