Lesson · 2nd & 3rd Grade
Inch Measurement
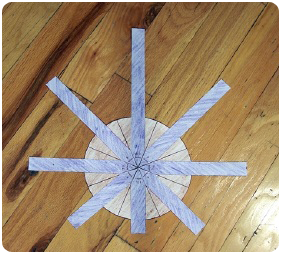
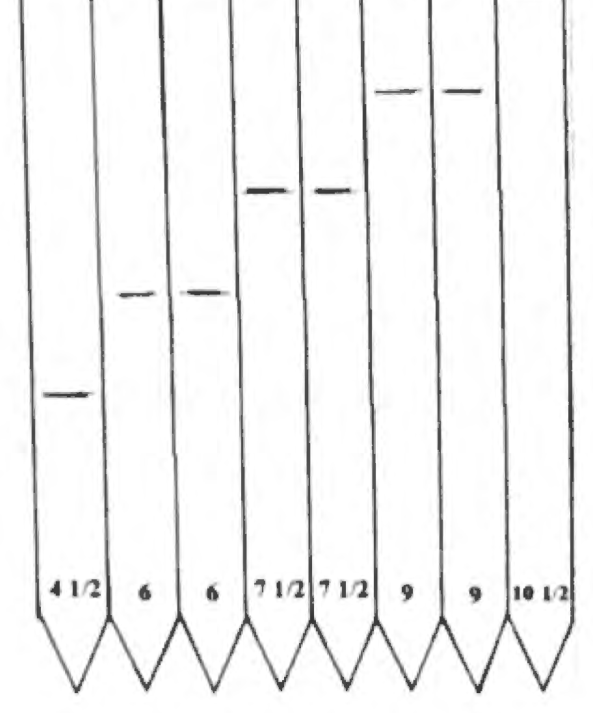
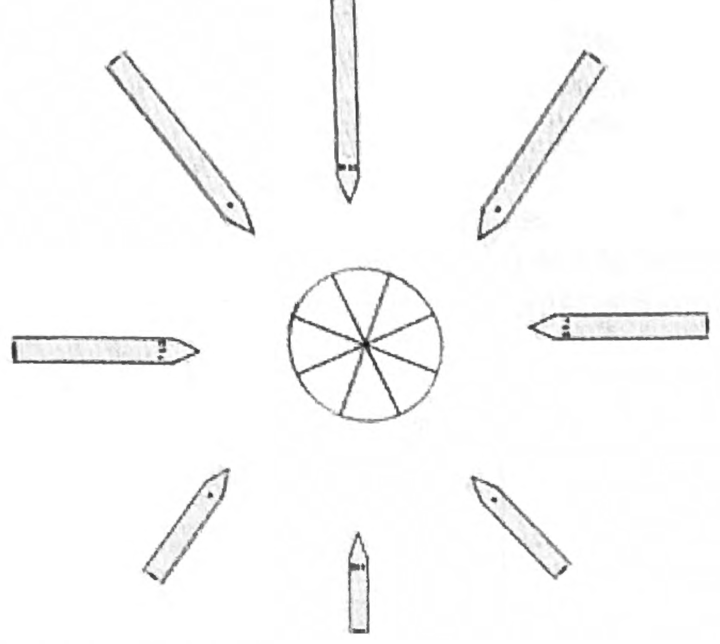
This lesson teaches students to measure lengths in inches. More specifically, they must accurately measure five lengths: 3½, 5, 6½, 8, and 9½ inches, then turn the measured strips into a sunburst design.
The big idea
Measuring with a ruler can seem easy to an adult, but young and inexperienced students often find it difficult. The most common mistakes are worth naming up front:
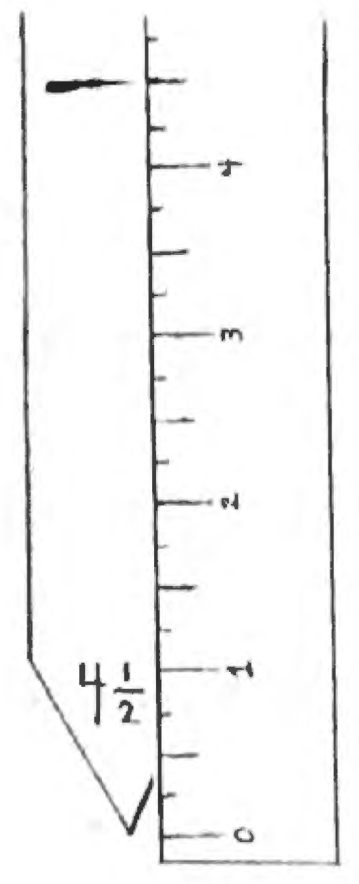
- Failing to line up the zero correctly.
- Lining up the zero correctly, but then shifting the ruler out of place while searching for the measurement.
- Forgetting the half. Instead of 9½ inches they measure 9 inches, or instead of 6½ they measure 6.
- Confusing halfway measurements with quarter measurements.
Building the measuring into an art project gives students many repetitions of careful ruler work without it ever feeling like a worksheet.
Learning objectives
By the end of the lesson, students will be able to:
- Line a ruler up at zero and hold it steady while measuring.
- Measure whole-inch and half-inch lengths accurately.
- Mark a measured length precisely with a dash.
- Tell a half-inch mark apart from a quarter-inch mark.
Common Core alignment
- CCSS.MATH.CONTENT.2.MD.A.1
Measure the length of an object by selecting and using appropriate tools such as rulers, yardsticks, meter sticks, and measuring tapes.
Students use a ruler to measure each strip's exact length, the core skill this standard names.
- CCSS.MATH.CONTENT.3.MD.B.4
Generate measurement data by measuring lengths using rulers marked with halves and fourths of an inch.
The half-inch lengths (3½, 6½, 9½) match the half-inch ruler precision this grade-3 standard targets.
Materials
- Pencils (1 per student)
- Starter sheets, page 100 (1 per student)
- Rulers (1 per student)
- Circle sheets, page 101 (1 per student)
- Scissors (1 per student)
- Crayons (2 colors per student)
- Glue sticks (1 per student)
- The completed project, prepared by the teacher before the lesson
The project
To start, students get a sheet divided into eight strips. Written at the bottom of each strip is that strip's required measurement. Explain that the strips are all the same size right now, and that it is the students' job to make each one the size indicated. Each strip comes to an arrow-like point at the bottom, and students measure starting from that point. Remind them that we always start measuring from the zero, and have them mark each measurement with a dash. It helps to measure the first two strips together as a class before students continue on their own.
Once every strip is marked, students color them all with a single color of crayon, then cut out the different-sized strips so each looks like an arrow. With a crayon of a different color, they color the entire circle on the circle sheet and cut it out. Finally, they glue the eight strips pointing inward onto the circle.
Common student mistakes
- Not starting at zero. Measuring from the end of the ruler or from the "1" throws every length off.
- Dropping the half. 9½ becomes 9. Call out the half-inch strips specifically.
- Letting the ruler drift. A ruler that shifts mid-measure gives a wrong dash. Have students hold it down firmly.
Related lessons
Centimeter Measurement
The metric companion to this lesson, using the same careful measuring technique.
Perimeter
Perimeter is built from measured inch lengths, so this lesson is good preparation.
Area
Area uses square inches; measuring inches first makes that unit concrete.
Map Scale
Reading a map scale depends on the precise ruler work practiced here.