Lesson · 3rd & 4th Grade
Radius of a Circle
This lesson teaches students how to make circles using given radii. It also teaches the precise definition of a circle: the set of all points a fixed distance (the radius) from a given center point.
The big idea
In kid-friendly terms, a circle is a bunch of dots that are all the same distance away from a middle dot. That middle dot is the center, and the fixed distance is the radius. Building circles dot by dot, rather than tracing a round object, makes that definition something students can see taking shape.
Learning objectives
By the end of the lesson, students will be able to:
- State that a circle is all the points a fixed distance from a center.
- Identify the radius as that fixed distance.
- Draw a circle of a given radius by plotting dots with a ruler.
- Measure radii accurately in centimeters.
Common Core alignment
- CCSS.MATH.CONTENT.7.G.B.4
Know the formulas for the area and circumference of a circle and use them to solve problems; give an informal derivation of the relationship between the circumference and area of a circle.
Plotting dots a fixed distance from a center introduces the precise definition of a circle that this standard's area and circumference formulas later build on.
Materials
- Pencils (1 per student)
- Rulers (1 per student)
- Circle sheets, page 153 (5 per student)
- Cylinder sheets, page 154 (1 per student)
- A scotch tape dispenser (for the teacher)
- The completed project, prepared by the teacher before the lesson
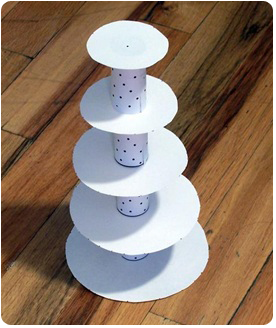
The project
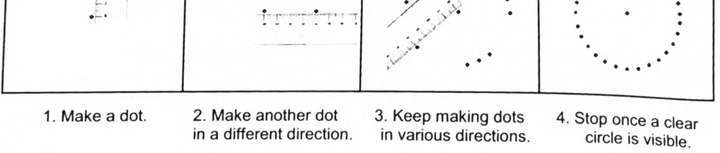
Students make five circles with radii of 4, 5, 6, 7, and 8 cm, starting with the largest and working down, using five copies of the circle sheet. Model how to use a ruler and pencil: make a dot, then another dot the same distance from the center in a different direction, and keep making dots in various directions until a clear circle is visible. Remind students to measure carefully, and explain that there is no reason to connect the dots; if they want smoother circles, they just make more dots. When all five circles are done, students cut them out along the dotted lines.
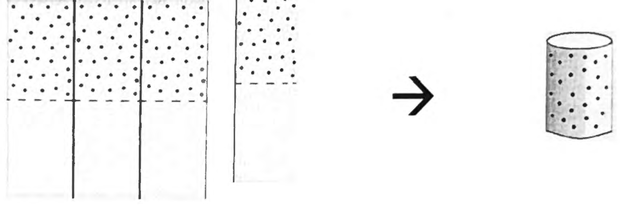
The last step is constructing cylinders. Students cut the cylinder sheet into four strips, cutting widthwise along the solid lines, then curl each strip so that only the polka-dot portion shows and tape it closed. Give extra help to students curling the cylinders too tightly or not tightly enough. The final tower is made by alternately stacking the five circles and four cylinders, with the largest circle (8 cm) on the bottom and the circles diminishing in size as they go up. The tower stands on its own without attaching the cylinders to the circles.
Common student mistakes
- Connecting the dots. There is no need to draw lines between them. A clean circle comes from making more dots, not from joining them.
- Measuring the radius carelessly. Every dot has to sit the same distance from the center, so a drifting ruler turns the circle into an oval.
- Curling the cylinders too tight or too loose. The tower only balances when the cylinders are curled consistently; this is where students most need a hand.
Related lessons
Centimeter Measurement
Plotting a radius in centimeters reuses the careful metric measuring built there.
Angles
A full circle is 360 degrees, one of the landmark angles from that lesson.
Volume
Another project that stacks paper shapes into a self-standing tower.
Area
A circle encloses a region, connecting the radius to the idea of area.